|
3/20/2019 0 Comments Hobbyists are Better Scientists: Why You Should Start Growing Mushrooms and How to Do It
By Savvas Constantinou
The life of an academic, or anyone who associates themselves with science, is a busy one. Scientists are constantly researching background material, writing proposals for research, conducting research, analyzing data, writing up and presenting the data, and making meaningful conclusions… tasks which quickly spill outside the standard “40 hour week” schedule that has been adopted in most professional settings. Having the time to do anything outside of work can be challenging; however, there is mounting evidence that hobbies have a positive influence on researchers’ overall health and wellbeing (Rosen, 2018)
One of the most difficult parts of starting a new hobby is finding one that is the right fit for your skills, time, space, and attention needs. A hobby that I believe is a great addition to the modern scientist’s life is mycology- specifically, growing mushrooms. Mushrooms are organisms that are ubiquitous in nature, regardless of your location and time of year. A walk outside will allow you to spot multiple types of fungi. The fungi that we cannot see are also a huge part of our lives: they cause our bread to rise and they add ethanol to our adult beverages. Other popular applications of mycology include growing mushrooms for culinary or medicinal purposes, and these are the topics I will focus on here - the brewers and bakers can chime in on another article. Depending on how “deep” you get into the hobby, there are many benefits that make it an ideal match for a scientist’s busy schedule. Mycology is periodic, meaning that there are duties that involve a few consecutive hours of time, subsequently followed by weeks of waiting depending on the stage within the mushroom’s life cycle. This scheduling can be timed by the scientist/hobbyist so that an ongoing mushroom project doesn’t have to be put on hold just because of day job responsibilities. Mycology also offers opportunities to blend creativity with a very scientific perspective. There are occasions where you can use sterile technique while growing out species on agar plates, as well as points throughout the process where you can conduct experiments by varying substrate water content, ratios of components, testing different genetic potential, etc. While there is lots of jargon unique to mycology, I hope to introduce many of these terms here and highlight that they refer to tools and supplies that can often be made with regular household items. Most of the fungi that we consume and that are grown commercially follow the life cycle seen in Figure 1. The fungi start as spores, which can be thought of as haploid “gametes” (for those of you who remember your basic biology class). The spores germinate and begin to produce mycelium, a “root-like” network which is used to transport nutrients and explore the environment. The mycelium moves across the environment, releasing digestive enzymes that sequester nutrients and water that can then be transported throughout the mycelium network. In most species, the mycelium from 2 spores needs to meet and exchange genetics in order to be able to produce fruit bodies. Fruit bodies are the reproductive structures and exist solely for reproduction. The true “body” of mushroom species is the mycelial network. Only under the proper conditions will fruit bodies be produced, which then make structures for spore dispersal. The fruit bodies are the portion of the organism that is most often consumed. 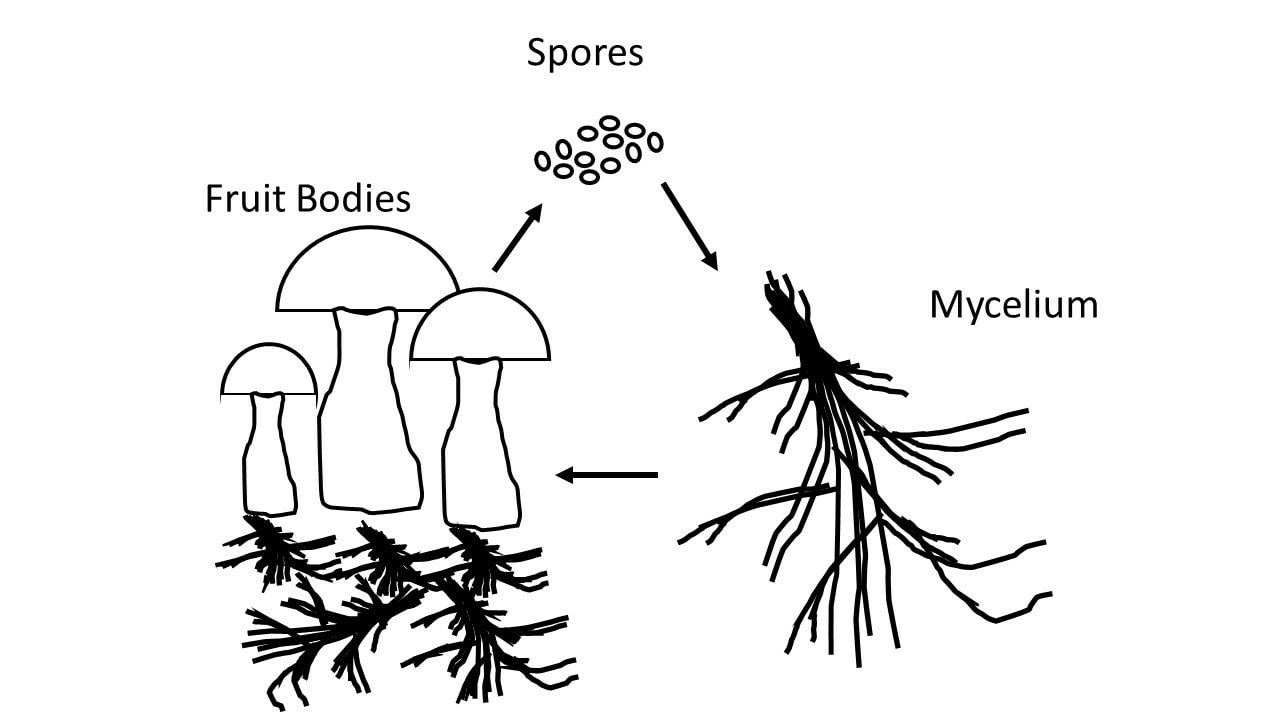
Figure 1: Generalized life cycle of most culinary and medicinal mushrooms. Haploid spores meet and produce a mycelial network. Once the mycelial network has enough resources and is exposed to proper conditions, it will produce the reproductive structures called fruit bodies. The fruit bodies produce structures which make and eject spores and are usually the part of the organism harvested for food/medicine.
The easiest way to get your feet wet before diving into the intricacies of mycology is to purchase a “grow kit” from a local store or via the internet. These kits are as “plug and go” as mushroom growing can be. The kit consists of a type of substrate (specific to the species being grown, but usually a mix of sawdust and a proteinaceous supplement) that is fully colonized by the mushroom mycelium of the species in question. The user then makes a small cut or hole in the packaging and puts the block into “fruiting conditions” and waits for the fruits to grow. Fruiting conditions refers to an environment that allows the mushrooms to start forming fruit bodies, a process known as “pinning”. These environments vary from species to species, but they share some basic requirements: a specific temperature range, a need for a relatively high humidity (RH), and free air exchange (FAE). Fruiting blocks often have enough nutrition to give multiple “flushes,” meaning that they are able produce fruit bodies multiple times. Soaking the block in water to rehydrate it and then exposing it back to fruiting conditions will frequently allow for another group of fruit bodies to form over 10-15 days. Unlike plants, the wait time between first seeing mushroom “pins” to harvestable fruit bodies usually only takes between 8-14 days. Over the course of hours, you can notice rapid changes in size and form. For the beginner using a kit, fruiting conditions can be achieved as easily as adding a grocery bag/plastic over some of the block, putting the block into a plastic storage tote, or leaving the kit outside (given that the ambient conditions are close to that of what the species requires). Complicated grow rooms, or more commercial enterprises, will monitor humidity and temperature and have a system for air exchange that can be as simple as a 4 tier, covered, mini greenhouse with a humidifier and a fan. There are a plethora of websites and videos available that give information about different fruiting chambers and the needs for different species. The full process of growing mushrooms is given in Figure 2. The main steps in the process are culture work, spawn production, block production and fruiting. Some tentative, aspiring mycologists may choose to cut out the first half of the process or join in at a later stage by purchasing blocks that produce fruits to use as medicine or food; however, this is a much costlier approach than growing them from scratch. At first, the hobbyist can outsource early steps to save time, reduce contamination and user error, and sample the hobby before purchasing additional tools or space. However, if the hobbyist chooses to explore mycology for a longer period of time, every step that can be done at home will save a lot of money and is ultimately very rewarding. 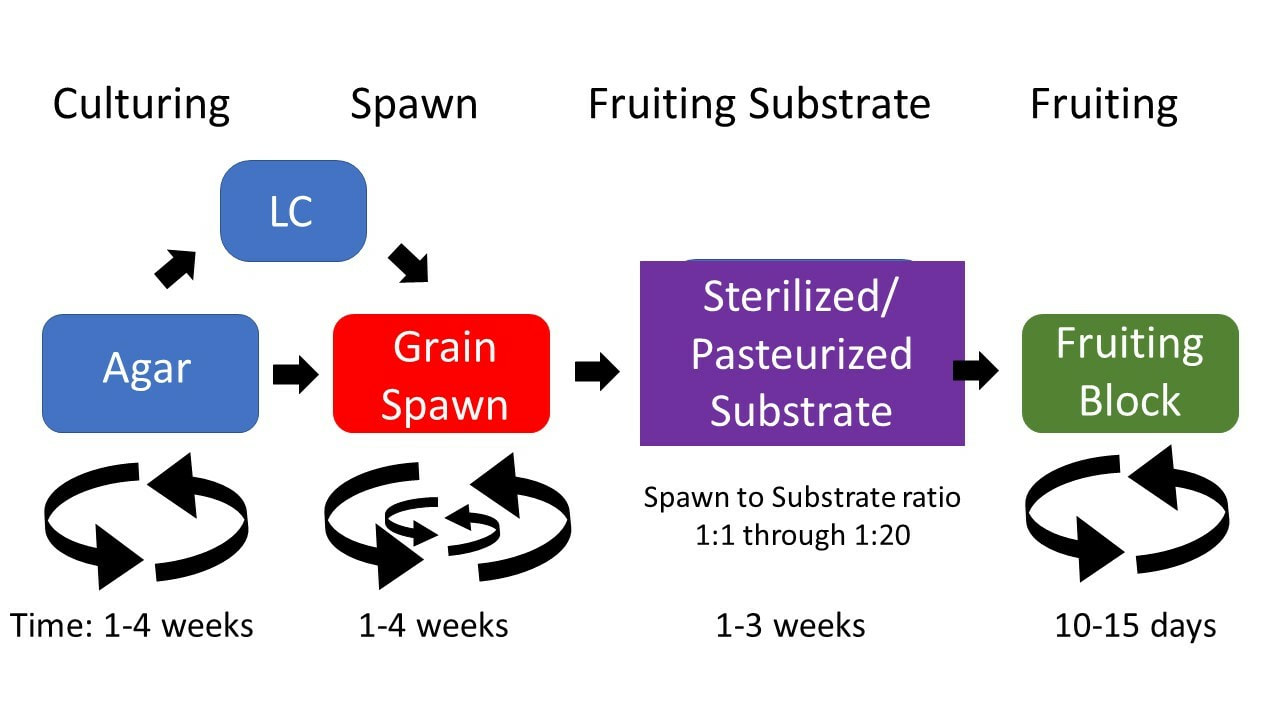
Figure 2: Timeline of steps in mushroom cultivation. The major steps are given above and the products of these steps are within the colored boxes. The amount of downtime required at any given step (to allow the mycelium/fruitbodies to grow) is given below. If the process can be repeated to expand the product, it is notated with circular arrows below the step; 1 agar plate can seed hundreds of other plates; a small portion of grain spawn can be used to inoculate a larger bag of grain spawn 2 times over, fruiting blocks can be rehydrated and produce another flush. The ratio of spawn to substrate is given; a high spawn ratio allows for faster colonization and a decreased chance of contamination, whereas a lower spawn ratio allows for more fruiting blocks to be prepared from the same amount of spawn but with decreased colonization times and increased contamination rates. 1:5 is a good place to start. LC= liquid culture.
The process of creating the blocks requires spawn and substrate. Spawn can be produced as described below, or purchased from the numerous companies that make it for a reasonable price. The basic idea is that a manufacturer (or you!) introduces spawn that only has mycelium from the species of interest to the sterilized fruiting substrate in a sterile environment. In this way, the cultivator can assure that the species of interest is growing, and that environmental bacteria and fungi do not contaminate the block. A sterile environment can be easily created through a “still air box,” which is essentially a plastic tote with arm holes cut in it or produced through a laminar flow hood that the serious cultivator can purchase or construct themselves. Depending on the species being cultivated, making substrate will likely require a pressure cooker or autoclave to produce. Often sawdust is used and placed into “mycobags,” which are thick plastic bags with a 0.2-5 micron filter for gas exchange. Sawdust can be supplemented with a nitrogen rich substance (soybean hulls, wheat bran, used coffee grounds, etc) to improve yields; however, too much nitrogen can cause blocks to contaminate more easily. The substrate is hydrated to about 65% and then cooked under 15-20 psi for about 2 hours. The high pressure causes sterilization of the substrate. Some species can tolerate a pasteurized substrate, which is exposed to 150-160°F for about 2 hours. Contaminate spores and bacteria are killed in this process, but there is a community of thermophilic organisms left behind that colonize the substrate as it returns to room temperature and inhibit the germination of environmental contaminants. Oyster mushrooms are a vigorous species and can be grown on pasteurized straw if using grain spawn (this is a great place for beginners to start). 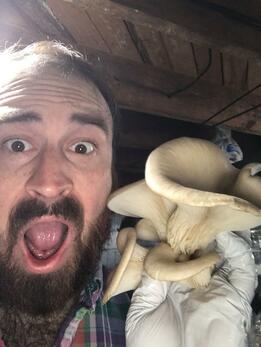
The author with several “fruit bodies” of delicious oyster mushrooms
The process of spawning is where the cultivator takes fully colonized spawn (a nutritious substrate that the mycelium is growing on) and mixes it with the fruiting substrate. If the fruiting substrate is sterilized, then spawning needs to occur in a sterile environment to ensure that no contaminants are given access to the sterile substrate. Pasteurized substrate can be spawned in open air and doesn’t require a sterile environment. After spawning, the mycelium grows from the grain spawn and takes over the fruiting substrate, producing a fruiting block that can be exposed to fruiting conditions after it is fully colonized to allow fruit body formation. Fully colonized blocks can be kept in the refrigerator for a few weeks before introducing them to fruiting conditions. A serious cultivator will soon find purchasing spawn to be costly and may choose to produce it themselves. Grain spawn is a preferred spawn material. These are food grains like rye, wheat, millet and even wild bird seed mix. Grain spawn is best purchased from a local feed store; 50 pounds can usually be purchased for $10-20 USD at one of these locations. Grain spawn is prepared by hydrating and cooking them, drying the exterior and then loading into mycobags and sterilizing at 15-20 psi for 1.5-2.5 hours. Once sterilized, the grain spawn can be inoculated by mycelium using an agar wedge or liquid culture (a suspension of mycelium in a liquid medium) in a sterile environment. Once fully colonized, the spawn can be used to inoculate the final fruiting substrate as described above, or kept in the fridge for a few weeks to months until use. The first process of cultivation, and likely one of the last for any hobbyist, is culturing. Companies are available that sell spores or mycelium of many species and can be used to start culture libraries at home. A hobbyist will usually acquire new species in liquid culture form, or as an agar wedge/plate. The mycelium can be introduced to agar plates (there are a multitude of agar recipes that can be used) and cultured out to ensure they are clean and free of contaminants. Once a clean culture is seen on agar, it can be used to directly inoculate a liquid culture or grain spawn. Long term storage options are available to keep a master collection for spawn production. Some recommended species to start working with are oyster mushrooms, lion’s mane, and red reishi. Red reishi (Ganoderma lucidum) is very easy to cultivate as it can be grown directly in bags and does not require a fruiting chamber. This species is very vigorous in its growth and forgiving for new cultivators. The disadvantage of this species is that its fruit bodies are only used medicinally and cannot be consumed for culinary purposes. Lion’s Mane (Hericium erinaceus) is relatively easy to grow as well, requiring a minimal fruiting chamber in most environments and it produces fruit bodies that have both medicinal and culinary applications. One disadvantage is that the mycelium of Lion’s Mane is very whispy, difficult to see, and looks similar to many common contaminants. Oyster mushrooms come in a variety of species and the temperature of your fruiting conditions plays a large role in determining what species. There are colder weather species like Blue oyster, King oyster, and Pearl oyster (~50-65°F), intermediate species like Phoenix oyster (~60-70°F) and warm weather species like Yellow and Pink oysters (70-85°F). Oysters are very aggressive and a great choice for your first attempt at growing an edible species. While this article contains a plethora of information, it outlines the steps required for one to grow their own mushrooms at home. The multiple steps of the process are outlined and can be paused for a decent length of time at each step. The involvement of the user and money saved are an inverse relationship; however, mycology at its core is a very inexpensive hobby and relatively unexplored by amateurs. Women are especially underrepresented in the mycology world. There are many opportunities for making contributions to the mycology community and new and diverse voices are welcome. Furthermore, mycologists can join a network that connects people with overlapping interests in culinary arts, gardening, farming, and/or biology that can be accomplished even by those with limited space and time. It is my hope that this article will entice more of the brilliant scientific women of the world to investigate this hobby. Work Cited Rosen, J., 2018. Play time for researchers: How hobbies can boost scientists’ productivity and creativity.” Nature 558: 475-7. doi: 10.1038/d41586-018-05449-7.
Comments? Leave them below!
0 Comments
Your comment will be posted after it is approved.
Leave a Reply. |

The Scientista Foundation, Inc. All Rights Reserved © 2011-2021 | Based in NY | [email protected]
The Network for Pre-Professional Women in Science and Engineering
The Scientista Foundation is a registered 501(c)(3) -- Donate!
The Network for Pre-Professional Women in Science and Engineering
The Scientista Foundation is a registered 501(c)(3) -- Donate!